I tried video once before myself, not sure why it doesn't work. Alternatively, you could post to YouTube (privately if you like) and then post the link here.
I'm strongly considering the same kit you got (with the smaller 20amp mppt controller though), so any details you'd like to share would be great.
Pics of how/where you mounted things exactly?
Ran new cables? Sizes?
Renogy Solar

Re: Renogy Solar
That's the way all panels come, with either two leads with MC4 connectors (most common these days) or in ye olden days with a j-box (but would have same single negative and single positive).dougm wrote:Yes they are in series because that is how the kit came. It doesnt come with proper plugs to hook them up any other way. Each panel has one male and one female connecter, one being positive and one being negative. The positive on one panel goes to the controler then the negative hooks to the positive on the other panel and last the negative on that panel goes to the controler ground terminal.
If you want them hooked up in series, then you do as you did and make a big "circle" going from positive solar controller (or switch) out to one panel positive, then from that panels negative to the next panels positive, then from that panel's negative to the solar controller negative.
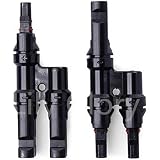
If you want them in parallel there are a couple of ways to do it. With just two panels you can buy a pair of MC4 "Y" connectors and use those. Then you hook the positives from each panel to one of the connectos, and the negatives from each panel to the other connector, and then run one down lead (on each, positive and negative) to the solar controller. This is the most common way to hook up RV solar panels.
Here is one example of the Y type connector:
https://www.amazon.com/LilyGlory-Branch ... ywords=mc4
Or there is this style:
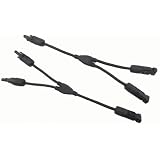
https://www.amazon.com/Signstek-Branch- ... ywords=mc4
You can also use a junction box (and really need to with more than two panels), but it's the same electrically as with the connectors above. For the MC4 connectors you can get your own crimp tool and then make your own connections with your preferred wire (I do it that way), but with two roof panels I'd probably just go with one of the Y connectors above if wiring just two panels in parallel - then no need for a junction box.
Another note is that oftentimes, #10 (or they sometimes come with #12) is not heavy enough for a down wire (too much voltage drop; depends on the individual setup and wire lengths). So then one thing you can do (if you don't have your own MC4 crimper) is buy an MC4 "extension cable." Cut that in half and you now have two MC4's with bare wire leads on the end. Clip those to the panels, and then join to your heavier wire (or junction box) with crimp of choice.
If you run the panels in parallel, then you will see the 18 volts/10 amps coming in from the panels. Parallel or series each have their advocates and their best situations. I tend to favor series, BUT if you have a situation where one panel will be shaded "by design" much of the time (by the Air-Conditioner shroud, say) then that's a case for parallel, as the non-shaded panel will still be cranking out full power (with series they act more as a unit).
1999 Concourse
Re: Renogy Solar
I might look into doing something different when i get the other 2 panels. It would be nice to have each pair function at full capacity despite what the pair on the other side of the roof are doing. These panels are short enough that i still have room on each side to mount another panel behind the ones i currently have rather then stacking them with drawer sliders. In fact these are short enough that i could actually put 3 total on the passger side end to end and i could do the same on the driver side if it wasnt for the bathroom vent fan LOL. But i would never be able to get on the roof to do maintenance.
Re: Renogy Solar
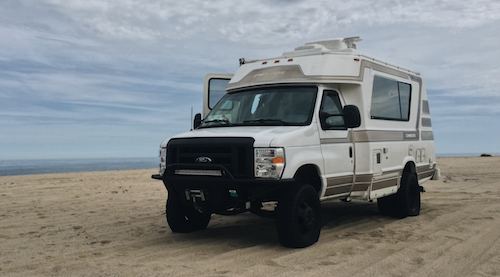
I will try to get some pictures Manitou, everything i took is video so i have to get back up on the roof to do it. I mounted the remote unit where the factory controller was in the overhead wall. The kit comes with 2 rolls of 8AWG cable which i routed threw the TV antenna holes into the drivers side overhead cabinets and then across into the forward overhead area and down behind the pilar cover threw the floor beside the LVM and into the battery compartment. I also ordered a battery temp sensor which doesnt come in the kit by the way. I chose to fabricate a cover for the TV antenna holes using 1/4" thick aluminum plate, i used the antenna mount base as a template to cut it out and to drill the screw holes, put sealer on it and screwed it on just like the antenna base, i drilled two small holes that line up with the antenna hole for the cables. I did it that way in case i ever have to pull the cables or add to the system and need to make changes ect.. I just used sealer on the two cables where they go threw the plate, but i have a large cable clam coming that i will put on when it arrives. The charge controller is bigger than the OEM unit and after much debate i removed the magazine rack off of the front of the sofa behind the driver seat, then cut a piece of 1/4" wood the same size as the magazine rack drilled monting holes and screwed that wood to the end of the couch using the existing magazine rack holes, i then screwed the controller to that piece of wood. I used an 1/8th inch thick aluminum sheet to make the panel behind the remote controller, i used the OEM panel to mark the holes and then i used a 3" hole saw to drill the hole for the back of the remote monitor to fit in. The Remote monitor comes with a piece that it sits inside so you dont have to drill a hole like i did but i just didnt want it sticking that far out from the wall.
Im not as good at organizing my thoughts as you guys so sorry if this seems random and or chaotic.
Im not as good at organizing my thoughts as you guys so sorry if this seems random and or chaotic.
Last edited by dougm on June 29th, 2016, 2:45 pm, edited 1 time in total.
Re: Renogy Solar
Got some pics with a gopro.
Last edited by dougm on November 22nd, 2020, 1:10 pm, edited 1 time in total.
Re: Renogy Solar
The Renogy system seems to be a decent setup. Even though the Remote monitor isnt as fancy with all the pretty LED lights the OEM had, its far more functional. It shows you everything you would want to know including volts and amps on the panel side of the controller as well as volts and amps on the battery side of the controller. It has more options you can set such as an alarm ect.. but i havent figured it all out yet.
Re: Renogy Solar
Thanks for the pics Doug.
After running into a guy with 800 watts of solar, 500ah of battery and a window style 5k air con unit.. It's got me questioning what's possible again. Probably a winter project for me anyway. Still appreciate all the info though.
After running into a guy with 800 watts of solar, 500ah of battery and a window style 5k air con unit.. It's got me questioning what's possible again. Probably a winter project for me anyway. Still appreciate all the info though.
Re: Renogy Solar
Looks good!
Manitou: I figured I could put 830 watts on the roof if I didn't want to do anything else. I have no need for that much power though, and I would miss my roof access. And I discovered I really enjoy having ground panels (I love shady camping spots). So I'll probably put my two 135's on the roof to complement the two 100 watt ground panels I'm running for the best of both worlds (for me).
Doug,
You can easily run two sets of "series parallel" panels when you add more - as long as you stay with same-voltage panels (or within .5 volts or so). That's how I'll be running my two sets when I add the roof panels. In other words, the ground panels are already in series. I'll make the roof pair be in series also, then I'll put those two sets in parallel.
Couple of notes:
--It's good you are getting the temperature compensation cable. That is really important.
--Good choice on putting the controller so much closer to the batteries. Especially when you have panels in series, the distance between controller and batteries is much more critical for voltage drop. I mean, voltage drop anywhere is bad, but the voltage coming out of the controller is lower, so more prone to voltage drop (and more critical since this is the voltage you are specifying down to the tenth of a volt for your batteries' charging desires).
--Have you customized he controller charge settings yet? Those are also key. You'll want to set the absorption charge voltage, the float voltage, and then there are usually settings for length of absorb or what triggers it to end, what triggers it to stay on longer, etc. Your battery mfg. should publish detailed charging info, so that's what you set to. Also, the temperature compensation should have a setting. The setting is for how much it changes the voltage for degree over or under 77º. You can set that ratio according to what the battery mfgr. recommends. You may also want to disable automatic equalize. Some batteries don't want you to equalize them at all, but even if they do, I prefer to initiate it manually. It's a fairly high voltage and I would want to provide extra ventilation, unplug certain items, be there to watch, etc.
Some controllers are easy to set right from the display. Others require doing it through a laptop (which is great, but a pain for me as they usually require Windows and I don't have Windows). There are also typically some "rough" settings via dips witches on the controller, but for the fine control you typically have to go to the display or a laptop/Windows.
--If you do find that one of your panels is often shaded while the other isn't (I could see that happening when a pair is on opposite sides of the roof), then you can easily change them to parallel with the Y connectors (but you would want to up the wire size if you calculated it for series since you'd be changing to half the voltage and twice the amperage).
--One last note is that since you are running in series, you will want to be sure that everything you have between the panels and the controller is rated up to the maximum voltage on a cold morning (some switches and fuses might not be). Looking at your panels' specs, and running them through a calculator, I see that on, say, a 20º morning you could see 22.9 volts per panel, which would mean 45.8 volts to the controller. Oftentimes switches or etc. are only rated to 32 volts, so it's something to check. Also just to be aware that this is not a "safe and friendly" "just" 12 volt line, as you kind of learn to expect in our typical DC setups.
I used Morningstar's string calculator in case you are interested. They didn't have your exact Renogy panels listed (yet), but I had always suspected they were the same as the Grape panels I have (same smaller dimensions) just with slightly heavier glass. I checked the specs for my particular Grape panels and "bingo!" exactly the same (except for the weight, but we don't care about that for this calculation). I used 20ºF for the record low temp (no idea where you are located or where you might travel). The colder it gets overnight, the more voltage the controller will see at the moment they start up in the morning.
Link to the calculator:
http://string-calculator.morningstarcorp.com/
Panel info I used (same panels from what I can see):
Brand: Grape
Model: GS-S-100-TS
With the above info you can play with temps in the calculator if you have a different temp scenario than I guessed at.
Nothing like the first few weeks of running along like a top on your own solar I still marvel at it after more than a year. (Previously I have had "some" solar on boats and etc. but never ran a completely "normal" (for me) life on it before. Plus now there are LED's etc.
Manitou: I figured I could put 830 watts on the roof if I didn't want to do anything else. I have no need for that much power though, and I would miss my roof access. And I discovered I really enjoy having ground panels (I love shady camping spots). So I'll probably put my two 135's on the roof to complement the two 100 watt ground panels I'm running for the best of both worlds (for me).
Doug,
You can easily run two sets of "series parallel" panels when you add more - as long as you stay with same-voltage panels (or within .5 volts or so). That's how I'll be running my two sets when I add the roof panels. In other words, the ground panels are already in series. I'll make the roof pair be in series also, then I'll put those two sets in parallel.
Couple of notes:
--It's good you are getting the temperature compensation cable. That is really important.
--Good choice on putting the controller so much closer to the batteries. Especially when you have panels in series, the distance between controller and batteries is much more critical for voltage drop. I mean, voltage drop anywhere is bad, but the voltage coming out of the controller is lower, so more prone to voltage drop (and more critical since this is the voltage you are specifying down to the tenth of a volt for your batteries' charging desires).
--Have you customized he controller charge settings yet? Those are also key. You'll want to set the absorption charge voltage, the float voltage, and then there are usually settings for length of absorb or what triggers it to end, what triggers it to stay on longer, etc. Your battery mfg. should publish detailed charging info, so that's what you set to. Also, the temperature compensation should have a setting. The setting is for how much it changes the voltage for degree over or under 77º. You can set that ratio according to what the battery mfgr. recommends. You may also want to disable automatic equalize. Some batteries don't want you to equalize them at all, but even if they do, I prefer to initiate it manually. It's a fairly high voltage and I would want to provide extra ventilation, unplug certain items, be there to watch, etc.
Some controllers are easy to set right from the display. Others require doing it through a laptop (which is great, but a pain for me as they usually require Windows and I don't have Windows). There are also typically some "rough" settings via dips witches on the controller, but for the fine control you typically have to go to the display or a laptop/Windows.
--If you do find that one of your panels is often shaded while the other isn't (I could see that happening when a pair is on opposite sides of the roof), then you can easily change them to parallel with the Y connectors (but you would want to up the wire size if you calculated it for series since you'd be changing to half the voltage and twice the amperage).
--One last note is that since you are running in series, you will want to be sure that everything you have between the panels and the controller is rated up to the maximum voltage on a cold morning (some switches and fuses might not be). Looking at your panels' specs, and running them through a calculator, I see that on, say, a 20º morning you could see 22.9 volts per panel, which would mean 45.8 volts to the controller. Oftentimes switches or etc. are only rated to 32 volts, so it's something to check. Also just to be aware that this is not a "safe and friendly" "just" 12 volt line, as you kind of learn to expect in our typical DC setups.
I used Morningstar's string calculator in case you are interested. They didn't have your exact Renogy panels listed (yet), but I had always suspected they were the same as the Grape panels I have (same smaller dimensions) just with slightly heavier glass. I checked the specs for my particular Grape panels and "bingo!" exactly the same (except for the weight, but we don't care about that for this calculation). I used 20ºF for the record low temp (no idea where you are located or where you might travel). The colder it gets overnight, the more voltage the controller will see at the moment they start up in the morning.
Link to the calculator:
http://string-calculator.morningstarcorp.com/
Panel info I used (same panels from what I can see):
Brand: Grape
Model: GS-S-100-TS
With the above info you can play with temps in the calculator if you have a different temp scenario than I guessed at.
Nothing like the first few weeks of running along like a top on your own solar
1999 Concourse