Looking for a pre 1997 Chinook concourse Owner

Everything about Chinooks that isn't option specific. Please check if your post is more appropriate in another category before posting here.
Post Reply
User avatar
Blue~Go
Senior Member
Posts: 3797
Joined: July 31st, 2014, 1:01 am
Location: 1999 Concourse

Re: Looking for a pre 1997 Chinook concourse Owner

Post by Blue~Go »

kyidletime wrote:When you say "batteries" as in what my converter/charger is charging, you're referring to my house battery(s), not my start battery, right? I guess that's another dumb question, but it's early and I'm not fully awake yet. :oops:
Well that makes two of us :D (Night owl here.)

I should have said "house battery" each time, but I may have slipped. I'm so used to two or more that maybe I said batteries. At any rate, the converter/charger charges your house batteries. That said, if you have a bi-directional separator (and I believe the Surepower 1315 in the '97+ Chinooks and also the Blue Sea 7622 are bi-directional), then some of that charge could be shared with the start battery, presuming conditions are correct for the separator to combine the two banks (which they likely would be).
kyidletime wrote:FYI I took a look at my converter/charger and although it is a 45 amp Magnatek, it is a 6345 model rather than 7445. I suppose that mine is just an older version of the same thing. My panel board CTL is a type 1, rating 30 amps, 120 vac.


I just took a look at one of those, and I see it's the same brown box, generally the same layout, etc. as the one I had. A couple of the pages I looked at are linked below, which show things pretty well:

http://www.ourelkhorn.itgo.com/convert.htm

http://home.earthlink.net/~whemme/

I would still encourage you to run a new/larger wire from the battery to the charger (the same wire likely also handles your DC loads; it did in my original setup). I know how it can sound overwhelming when you start thinking of everything at once, but maybe once you have the other things done you will reconsider it? 8-)

************
Okay, anyone not really interested can just stop right now and move on to other topics. Fair warning :mrgreen:

Just as an example, based on what my era Chinook has, and extrapolating it to where your house battery is under the hood on the passenger side...

Let's say 45 amps are running along the wire...

And let's say it's #8 wire (as in my era Chinook, but you can easily see by checking the red wire that comes in to the brown box as the supply - mine was in upper right over the DC fuse block).

And let's say the wire runs like mine does, but plus then continues on since your house battery is in a different place (now maybe they route the wire differently, but it's a long way no matter how you slice it). So, from the charger over to the wall = 3'
Over to behind the shower = 1'
Up to the wiring chase that runs above the window = 6'
Forward along the wiring chase to the forward overhead = 9'
Down the pillar to the floor and through a hole to the underside of the coach = 6'
Over to the driver's side frame rail = 2'
Forward along the frame rail, then up near the steering column to the engine compartment = 6'
(well ignore the solenoids for now)
Across the firewall to the passenger side = 5'
Then to the battery terminal = 2'

Total positive wire run = 40'

Then for the negative. Now usually, DC circuits are counted "both ways." Meaning the positive and negative run are added together (current has to flow through the whole circle). However, Chinook uses a chassis ground for much of the negative, so that is like a huge wire. So we can give a little credit. But there are still leads to get to the chassis, so we'll put those in:

From the charger to the chassis ground lug that is under the shower area = 7'
From the house battery to the frame = 2'

Total negative wire run is 9'
The chassis isn't infinitely huge, so I'm not sure what to "assign" that, but to be favorable, we'll just not count it at all. So of the wire we are "counting," we have 49'. Let's call it 50' which is 25' "one way."

So I go to voltage drop calculator and plug in the numbers, and get a voltage drop of 12.5% I have let the chassis part slide, but I would assume it has some voltage drop, tho maybe not much, as it is a "huge wire." (Is good to clean those contacts periodically, as they are outside under the rig.)

So the charger is putting out 14.4 amps, which is likely about what you want at 77º (just taking average flooded cell battery here). Now put in 12.5% voltage drop, and the battery actually gets 12.6 volts. Ugh!

Let's say you ran a new wire on a shorter route, under the couch by the wall.

So, from the charger over to the wall = 3'
Forward along the floor-to-wall joint under the couch and behind the water tank, then through the hole to the underside of the coach = 10'
Over to the driver's side frame rail = 2'
Forward along the frame rail, then up near the steering column to the engine compartment = 6'
Across the firewall to the passenger side = 5'
Then to the battery terminal = 2'

So this is now 28'
We'll keep the same lengths for the chassis ground leads, but also consider enlarging them so that you could go to a fuse size with a bit more headroom (optional).

From the charger to the chassis ground lug that is under the shower area = 7'
From the house battery to the frame = 2'

Total negative wire run is 9'
The chassis isn't infinitely huge, so I'm not sure what to "assign" that, but to be favorable, we'll just not count it at all. So of the wire we are "counting," we have 37'. Let's call it 38' which is 19' "one way."

Let's shoot for 2% voltage drop and see what size wire we come up with... I'd guess #2 would be a bare minimum size, but let's run the numbers. I'm using 14 volts since we're talking about the 14.4 volt output here.

#6 (6 AWG) gets it down to 6%, which turns the 14.4 volts into 13.5 volts. Still too much for my taste.
#4 gets it down to 3.8%, which turns 14.4 volts into 13.8 volts. Better.
#2 gets it down to 2.4%, which turns 14.4 volts into 14.05 volts. Much better
#1 is somewhat unusual, so we'll skip that.
1/0 gets it down to 1.5%, which is great but I already know there is no way you are running a 1/0 cable. It's tough when the charger is SO far from the house battery! If you were planning a more boondocking-heavy use, I'd be suggesting that you move the battery bank to under the couch, make it two batteries, and as a side benefit have a much shorter run, but since you are only planning the occasional night boondocking for now, and want to keep mods down to a dull roar, I'm not.

There is another option though....

You could go with a 40 amp "marine style" charger, and mount that under the couch. Say inboard of the water heater. Now your charging wire run is MUCH shorter, and you have a charger of which all the voltages can be adjusted specifically for your battery type (now and later), and you can either equalize automatically or manually or not at all. The output is temperature compensated, so when your house bank is at 90º or 42º the charger output will be automatically adjusted to "equal" the settings you put in for 77º F. It's more expensive, but I think you more than get what you pay for, plus you get a much shorter wiring run to the batteries. To me the temperature compensation is worth the whole thing, because why worry about voltage or voltage drop, if it's 40º out and you are charging at 14.4 volts (77º) but it should be 15.0 volts? (I don't have the manual for your battery, so used the Lifeline temperature change.)

The AC wiring being longer is not a worry because at 110 volts, voltage drop is not a concern.

So let's say you put it up by the water heater somewhere (either by wall, or between heater and front of couch).

Now you have a relatively short run from the charger to the fuse block ~12'
And from the charger to the house battery is ~18'
We'll count the negative leads to the frame at 6'

So that's 24' from charger to house battery "round trip", which for the calculator we halve to be ~12'

Now running the same voltage drop calcs:

#6 (6 AWG) gets it down to 3.8% , which turns the 14.4 volts into 13.8 volts. Still too much for my taste.
#4 gets it down to 2.4%, so 14.4 is 14.05 volts
#2 gets it down to 1.5%, which turns 14.4 volts into 14.18 volts. Not too bad.
#1 is somewhat unusual, so we'll skip that.
1/0 gets it down to .9% Hey, 14.4 volts is still 14.27 volts!

Then on the "other" side, we have the run to the fuse block. This is around 12', plus we'll say 6' for negative leads, so 18', divided by two, is 9' effective one way run. We can also drop the 45 amps down to, say, 30 amps (this is just a guess in that you probably won't be running more than 30 amps on a regular basis through the house fuses. The wire will still be safe for the full amount, but we're talking voltage drop here. We do have to lower the voltage from 14 volts (which I used to calculate the charger run) to 12 volts. Most loads are supposedly fine with 10% voltage drop, with more sensitive things wanting no more than 3%, so I like to shoot for 3% overall on the load side of things. This still realistically results in more voltage drop, because you still have the runs to the loads themselves. But I feel it is acceptable.

So if you re-used some of the #8 wire you just got rid of...
#8 (8AWG) results in 3.5% voltage drop using our figures.
#6 (6 AWG) gets it down to 2.2%, so really no need to go further.

You would then need to run an extension AC wire from the charger to the brown box.

I realize you may still prefer to go ahead with just the PD charger, but I figured I'd run some scenarios so you could see the numbers. Of course you already know I'd be putting a marine style 40 amp charger under the couch! :mrgreen:

[Actually, I mounted the charger on the front side of the shower wall, under the back corner of the sink cabinet, BUT, I have the battery bank under the couch, so the run is not that long. I'm still going to be running large DC wire because every little bit counts with large DC amperages - I just wanted to use that otherwise wasted space, and I already have a bunch of stuff under the couch!]

1999 Concourse
kyidletime
Posts: 154
Joined: September 8th, 2015, 4:02 pm

Re: Looking for a pre 1997 Chinook concourse Owner

Post by kyidletime »

BG, I haven't completely given up on the idea of running larger wire from my house battery to the charger, it shows that it is 8 gauge, would you think that 6 gauge would be ok? I just don't want to disassemble my rig to do it, if you know what I mean. I'm not as adventuresome as you, or as knowledgeable.

Those two links that you sent me have some great information on them. I'm sure that they will be a big help installing my ne charger. Which by the way, I ordered a Progressive Dynamics PD 4645 today. The next thing that I plan to order will be the Bluesea 7622. Like I said earlier, it makes sense to me to wait until spring to get my new house battery.
Alan Croy
Hamilton, Ohio
1995 Chinook Concourse
Upgraded Converter/Charger System.
kyidletime
Posts: 154
Joined: September 8th, 2015, 4:02 pm

Re: Looking for a pre 1997 Chinook concourse Owner

Post by kyidletime »

BG, I was doing a little more exploring wit the wiring on my rig and found someth1ng interesting. The red 8ga wire from the house positive goes thru a couple of fuse block (50 amp I think), and then goes to the "mystery" Eichlin solenoid, the down underneath to I'd guess to the brown box. Remember too that the gray wire from the solenoid is unattached under the dash. I don't know if that gives you any ideas as to the purpose of the Eichlin, but it makes me wonder.
Hope that I'm not bugging you too much!
Alan Croy
Hamilton, Ohio
1995 Chinook Concourse
Upgraded Converter/Charger System.
User avatar
Blue~Go
Senior Member
Posts: 3797
Joined: July 31st, 2014, 1:01 am
Location: 1999 Concourse

Re: Looking for a pre 1997 Chinook concourse Owner

Post by Blue~Go »

Not bugging me too much at all. Fire away!

I think what you have found confirms what we thought about the Echlin solenoid. Or at least what I suspected. Which is that it was used as part of the system to connect/disconnect house loads from house battery. There is a similar switch/solenoid on the '97+ rigs, but just slightly newer technology. The switch in the later rigs is on the cab overhead, and the solenoid I believe is part of the LVD module.

To review: Connecting/disconnecting house loads from house battery requires a "largish" switch. BUT, Chinook wanted to have a cute little switch in the cab (not a bad desire). To make a cute little switch do a big job, you run it through a relay. That way the "little" switch just needs to energize a relay, which does not take much, and then the relay does the heavy lifting.

I don't think the Echlin solenoid itself was original because it looks too shiny. But the brackets holding it look like the original Chinook brackets in both style and age (look just like the brackets Chinook made to hold my generator start breaker in a similar position).

My guess would be the original solenoid failed, someone put in the Echlin and maybe it didn't work or then later failed, so they abandoned it entirely and put in the big manual switch on that metal "shelf" under your hood.

PS: On the wire size from house loads/charger to house battery, I am working on something and will get back to you later - not forgetting about it!
1999 Concourse
User avatar
Blue~Go
Senior Member
Posts: 3797
Joined: July 31st, 2014, 1:01 am
Location: 1999 Concourse

Re: Looking for a pre 1997 Chinook concourse Owner

Post by Blue~Go »

kyidletime wrote:BG, I haven't completely given up on the idea of running larger wire from my house battery to the charger, it shows that it is 8 gauge, would you think that 6 gauge would be ok? I just don't want to disassemble my rig to do it, if you know what I mean. I'm not as adventuresome as you, or as knowledgeable.
Well, there are two facets to this. One is safety. Fuses/breakers (know as OCP, for over-current protection) are sized by the wire. As long as the wire can be safely fused as high as you need it for the loads, then that basic is covered. The #8 wire is getting a bit close on this (the fact that it runs in a huge bundle, plus goes through en engine space, de-rates it some), but it's doable.

The second facet is getting what you want through the wire to its destination. Say you want 14.4 volts at the battery when charging. The charger is putting out 14.4 volts, so you are good there. But high amperage/low voltage (anything nominally 12 volts is low voltage for these purposes. vs. say 110 volts) is very subject to voltage drop. An analogy is that you have two gallons of water in a bucket, and your carrots need two gallons of water. You need to carry the bucket a mile. So far so good. But now punch some holes in the bucket and do the same trip. You may arrive with only a gallon. Or less. This is essentially what voltage drop does. Your hard earned power is leaking out before it gets to the destination.

The two factors are wire length and wire size -- as set against voltage and amperage.

So if trying to get 45 amps at 14.4 volts to the battery to charge it, the long #8 wire works, but it's a bit of a leaky bucket. A #6 will be better (smaller holes in your bucket). There is no definitive cutoff, as each wire size (and each foot less of length) will make for fewer holes in the bucket. There will almost always be some (since we can't use wires the size of tree trunks), so it's a matter of getting it to an acceptable level for the circumstances and your expectations.

There's another factor here. Since the PD charger doesn't have temperature compensation, it will only be putting out the exact voltage the battery wants at 77ºF (battery at that temperature, which may differ from surrounding air due to the mass). Since it's always putting out the desired voltage at 77º, when the batteries are colder the voltage will be lower than desired, and when they are warmer the voltage will be higher than desired. So you might say there is no sense going crazy to eliminate voltage drop.

On the other hand, your flooded cell battery is not as "finicky" as some other battery types. And you are not making up an "ultimate" system here. So it's a matter of balancing everything: Use-case, money, where your "good enough" personal threshold is, at what point you might as well just buy a battery a bit more often, etc.

Okay, have I put in enough qualifications up there? :D :D

I sense that you are looking for a "reasonably good enough" (RGE) scenario here. This is not a do-or-die boondocking scenario, and you are not putting in $1500 worth of batteries. So I figure you are looking for that first "reasonable bang for buck and effort" level of improvement, but not necessarily any more. You already have the charger, and it's one that's meant to mount in the brown box, so that location is set.

To meet that perceived RGE level, I would run a #6 cable along a shorter route, behind the couch. Or at least, I would look at that scenario (I know what it takes in my rig, but yours is not exactly the same). I mean, it would certainly be MUCH easier then running a new cable via the Chinook route. That's more convoluted. Or just leave the #8 and know you have a large amount of voltage drop. You can compare in the scenarios I posted above.

Thinking out loud, here are the "work points" in running a new charger wire behind the water tank/under the couch:

1) Pulling the brown box forward to get behind it.
2) Fitting in the end of the new wire to the screw terminal (you may have to trim a few strands).
3) If you want to be thorough, and if you want to be able to fuse a tad larger, then you'll want to run a new wire to the chassis ground (there are quite a few holes already in the Ford frame; I simply chose one and then attached my new ground ring lug via bolt/washer/nut).
4) Then physically running the wire behind the couch, probably in some loom.
5) Getting the wire through the floor to the underside (you may be able to use the same hole as the number 8 wire; or if not, you'd need to drill a hole through the floor; my floor is about 2" of plywood).
6) Running the wire (in loom) up to the battery under the rig and through the engine compartment. I simply copied the Chinook run, but with a few extra securing points where I saw a slight lack (but it was pretty good to begin with).
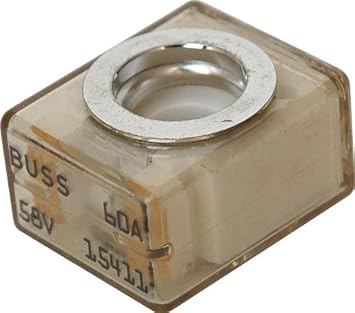
7) Hopefully adding an MRBF terminal and fuse to the positive post on the house battery. This protects the wire from a short that could occur if the wire rubbed through to the frame, etc. This was accomplished on my Chinook originally with a couple of self-resetting breakers, but they were a few feet from the battery and plus I have no idea what their AIC rating was. Having the fuse right on the battery post (presuming you have the height) means there is no unprotected wire between the battery and the fuse.
8) Somewhere along that positive line you will likely want to make a provision for a switch, such as the aforementioned Blue Sea. It's best to have it as close to the battery as possible, but you could possibly compromise so as to put it inside the van. Or use a solenoid to make a remote switch as Chinook did (I'm not up on just picking your own, and the Blue Sea one is overkill and over $$ for your setup). I like a simple manual switch myself. Robust, no solenoid, etc. But that's a matter of taste and usage pattern.
kyidletime wrote:Those two links that you sent me have some great information on them. I'm sure that they will be a big help installing my ne charger. Which by the way, I ordered a Progressive Dynamics PD 4645 today. The next thing that I plan to order will be the Bluesea 7622. Like I said earlier, it makes sense to me to wait until spring to get my new house battery.
Plus this gives you all winter to work out what you want to do, get it implemented, etc. Nice to not have a rush.
1999 Concourse
kyidletime
Posts: 154
Joined: September 8th, 2015, 4:02 pm

Re: Looking for a pre 1997 Chinook concourse Owner

Post by kyidletime »

That's ok. I'm going to put in 6 gauge copper wire. I crawled around under my rig today and removed all of the 8 gauge wire, and will pick up my 6 gauge wire tomorrow. I did find a place where the wire had apparently gotten hot up in the engine compartment. The conduit on the 8 gauge wire and the conduit on two other smaller wires had melted off and together. There didn't appear to be any damage to the wire though, so I replaced the damage conduit on the smaller wires. What do you think about using the existing Echlin (since it's already there), that may be what it was doing before, and the toggle switch was doing the job. I have two breaker located right near the battery. (the wiring diagram shows them to be 50 amps each)

PS I'm only going to have from 20' to 25' of positive wire from the battery to the charger, and approximately 6' of ground wire.
Alan Croy
Hamilton, Ohio
1995 Chinook Concourse
Upgraded Converter/Charger System.
User avatar
Blue~Go
Senior Member
Posts: 3797
Joined: July 31st, 2014, 1:01 am
Location: 1999 Concourse

Re: Looking for a pre 1997 Chinook concourse Owner

Post by Blue~Go »

kyidletime wrote:That's ok. I'm going to put in 6 gauge copper wire. I crawled around under my rig today and removed all of the 8 gauge wire, and will pick up my 6 gauge wire tomorrow.


Well go you! Not wasting any time I see :D Not to minimize that projects can get out of hand, but I do often find that "just doing it" is not as bad as I had made it out to be.
kyidletime wrote: I did find a place where the wire had apparently gotten hot up in the engine compartment. The conduit on the 8 gauge wire and the conduit on two other smaller wires had melted off and together.
A side-benefit to getting in there and replacing things: You get a good look at everything.
kyidletime wrote: What do you think about using the existing Echlin (since it's already there), that may be what it was doing before, and the toggle switch was doing the job. I have two breaker located right near the battery. (the wiring diagram shows them to be 50 amps each)
I could see where using a solenoid and "small" switch in the cab could be convenient. I'd want to ascertain that it was the right spec for the job (since it looks replaced by who-knows-who), and then check to see if it is actually working (because often when someone bypasses something .... it wasn't just because they were bored that day, if you know what I mean).

If it were me? I'd replace those breakers. Who knows what the AIC rating is, and being "self re-setting," then do you know if you have a problem and they've blown? Are they robust? Plus what about the cable between the battery and the breakers? But that's just me. If I had the height (I do on my rig), I'd have an MRBF on the positive terminal. With a non-bundled #6 wire (and presuming you don't leave any of the negative #8 in the circuit either), running in an engine space, you can fuse up to 100 amps if the wire is rated to 105ºC (will be printed on wire insulation) or 80 amps if rated to 90ºC. That's not to say you have to go that high, but I might bump it up to 60 or so.

Here is what I would put on the house battery positive post:

http://www.amazon.com/Blue-Sea-Systems- ... words=mrbf

($21 on Amazon)

Image

With this fuse (plus lay in a spare or two) (as mentioned you could go larger if you want, but there's no need):

http://www.amazon.com/Blue-Sea-Systems- ... words=mrbf

($17 on Amazon)

Image

You could use a breaker, but then you have to mount it somewhere, there is unprotected wire, no spare, etc. The fuse is right where you want it, just fits right onto the marine post terminal, and is simple and robust and it costs $17 to have a spare. Not that you should be blowing it.
kyidletime wrote:PS I'm only going to have from 20' to 25' of positive wire from the battery to the charger, and approximately 6' of ground wire.
Well that sure beats the nearly-40' you had before! Also it won't be bundled (in the upper wall), and it'll be larger. Win/win. You'll have much less voltage drop, which is great!

PS: Here is a thought: When I eliminated this wire (ran a larger one), I did tear it out from under the rig, but I left the part in place from the fuse box area (brown box) to just before it exited the "living room" up by the front of the couch. Now I have a nice, big feed wire for putting a 12-volt charging station (or whatever) in the forward couch/TV compartment area. (It does then need a new fuse position on the DC fuse block, but I put in a 12 position block; if you don't have an extra fuse position you could add one, or at least just save it for future use.) Hey, there is a nice big wire you don't have to run!
1999 Concourse
kyidletime
Posts: 154
Joined: September 8th, 2015, 4:02 pm

Re: Looking for a pre 1997 Chinook concourse Owner

Post by kyidletime »

Hi! Been crawling around under the RV again. (too hard on this 75 year old body!) I think that I have the route for my new wire figured out. It wasn't easy finding a good place to go from underneath to above the floor, too many thing in the way, but did finally get it figured out. My project for this afternoon is to run the wire. (more crawling around on the driveway. :roll: )
Alan Croy
Hamilton, Ohio
1995 Chinook Concourse
Upgraded Converter/Charger System.
Skillet
Posts: 495
Joined: March 22nd, 2015, 7:45 am
Location: Northern Virginia

Re: Looking for a pre 1997 Chinook concourse Owner

Post by Skillet »

Do you have it jacked up? I can't fit under mine.
'02 Concourse where there's always a project going on...
kyidletime
Posts: 154
Joined: September 8th, 2015, 4:02 pm

Re: Looking for a pre 1997 Chinook concourse Owner

Post by kyidletime »

No, not jacked up, it was a tight fit in places. Like I said, I'm glad that it's done. 8-)
I am however, looking for someone else who has replaced their charger/converter on similar model (95 Concourse), got a couple of questions about things not covered in replacement instructions.
Alan Croy
Hamilton, Ohio
1995 Chinook Concourse
Upgraded Converter/Charger System.
Post Reply